

Blog
How to Choose a Sliding Shower Door Hardware Kit

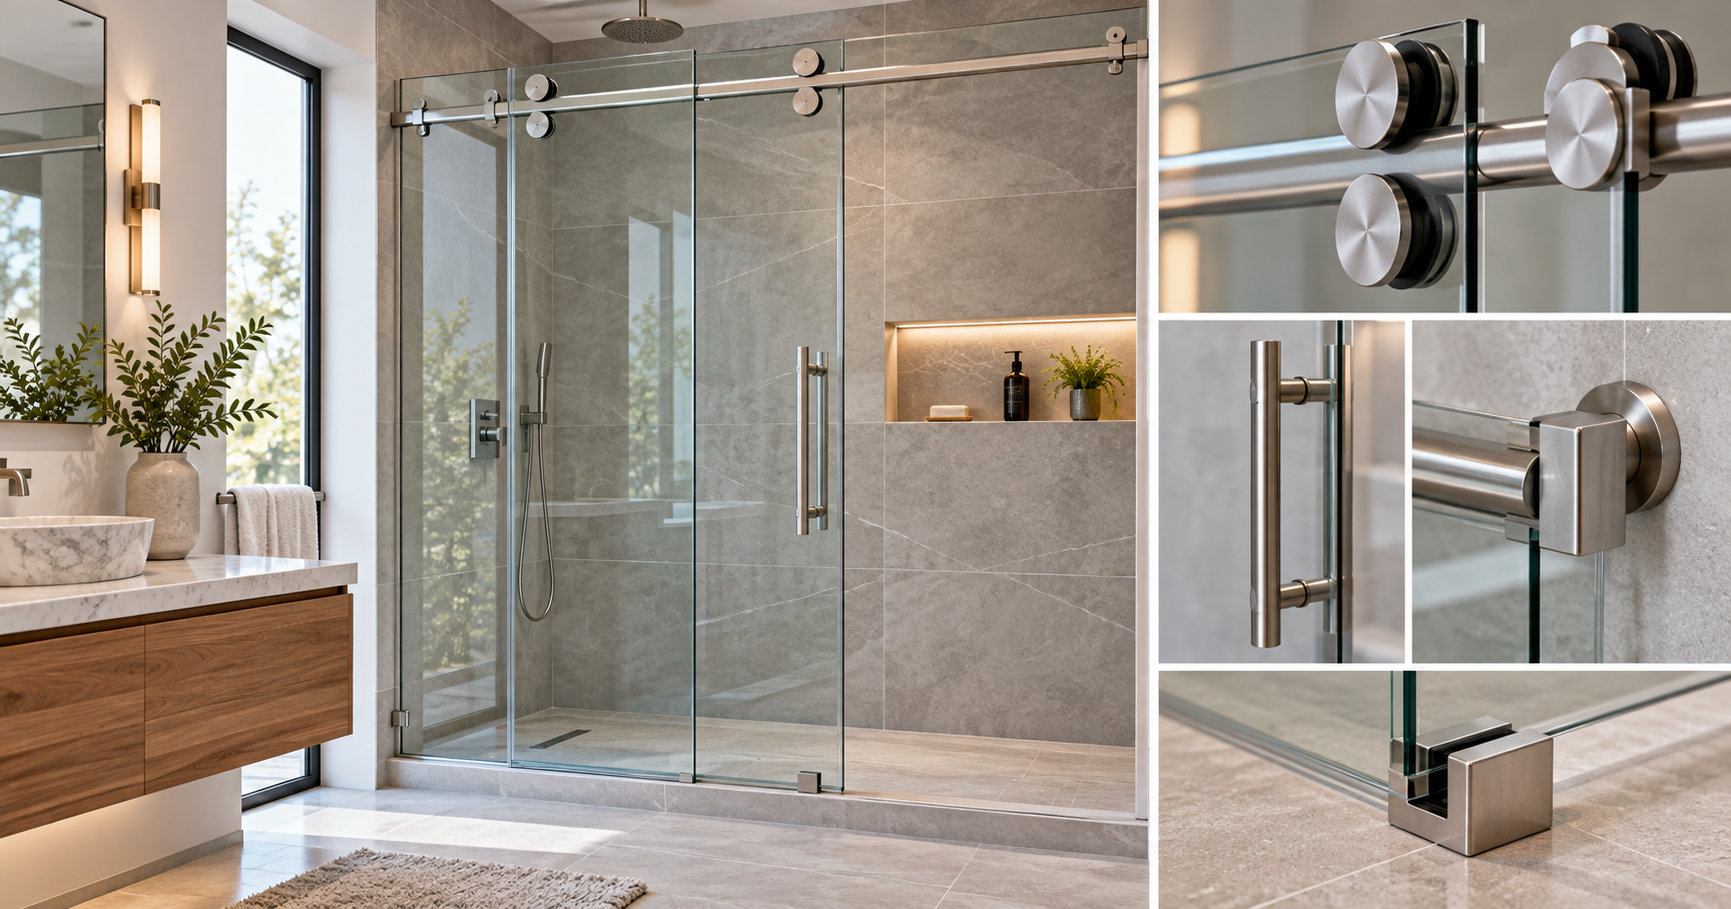


A sliding glass shower door can save space, create a wider entrance and give a bathroom a clean, modern appearance. However, the door will only operate safely and smoothly when the hardware matches the glass, opening and installation conditions.
Choosing a sliding shower door hardware kit requires more than selecting an attractive finish. You must verify the door configuration, glass thickness, panel weight, track length, mounting method and structural support. The rollers, rail, guides, stops and brackets must also be designed to work together as one system.
This guide explains how to compare sliding shower door kits and avoid compatibility problems before installation.
What Is Included in a Sliding Shower Door Hardware Kit?
A typical kit may include:
- A top rail or sliding track
- Door rollers or roller assemblies
- Fixed-panel brackets
- Wall-mounting hardware
- Bottom guides
- Door stops
- Anti-jump components
- Handles or pulls
- Fasteners and anchors
- Installation templates
- Gaskets, seals or bumpers
Not every kit contains all these components. Some products include only the sliding mechanism, while glass panels, handles, sweeps and mounting brackets must be purchased separately.
Always read the complete contents list instead of assuming that the word “kit” means everything required for installation.
Start by Identifying the Door Configuration
The first step is determining how the panels will move. Sliding systems are not universally interchangeable.
| Door configuration | How it works | Best suited for |
|---|---|---|
| Single sliding door | One panel slides while the other remains fixed | Alcoves and modern frameless enclosures |
| Bypass door | Two panels slide past each other | Openings that need access from either side |
| Barn-style slider | A top-hung door rolls across a visible rail | Contemporary frameless installations |
| Corner sliding system | Sliding panels meet at or move around a corner | Corner showers with limited outward clearance |
| Framed sliding door | Glass moves inside a surrounding frame | Traditional shower enclosures |
| Semi-frameless system | Uses reduced framing with exposed glass edges | Transitional bathroom designs |
A single-slider kit cannot automatically be converted into a bypass system. The rail length, roller position, panel overlap and bottom guide will be different.
Confirm whether the kit is designed for:
- One moving and one fixed panel
- Two moving panels
- Left-hand or right-hand opening
- Reversible installation
- Wall-to-wall or corner installation
Determine Whether Glass Is Included
Some sliding shower door kits include tempered glass panels. Others provide hardware only.
A hardware-only kit may be appropriate when you are ordering custom glass, replacing an existing system or working with an unusual opening. However, the glass must be fabricated specifically for the selected hardware.
Check whether the system requires:
- Holes for roller assemblies
- Notches for brackets
- Cutouts for handles
- Special edge preparation
- A specific panel overlap
- A fixed-panel mounting channel
Tempered shower glass should not be cut, drilled or notched after tempering. Final hardware dimensions and hole locations should therefore be confirmed before the glass is manufactured.
For openings that cannot accommodate a standard kit, a properly planned custom enclosure may provide a better fit.
Match the Kit to the Glass Thickness
Every roller, bracket, guide and gasket is designed for a specific glass thickness or limited thickness range. A component intended for one thickness may not grip or support another safely.
Review the manufacturer’s specifications for:
- Minimum and maximum glass thickness
- Required tempered glass type
- Gasket thickness
- Roller bolt length
- Guide opening width
- Bracket clamping range
Do not try to compensate for incompatible glass by adding improvised washers, spacers or sealant. The complete system should be rated for the actual glass being installed.
Check Both Door Weight and Panel Width
Glass thickness is only part of the calculation. The sliding panel must also fall within the kit’s weight and width limits.
A large glass door may exceed the capacity of the rollers even when its thickness is technically compatible. An unusually narrow panel may also fail to maintain the overlap or roller spacing required by the system.
Verify:
- Maximum weight per sliding panel
- Minimum and maximum panel width
- Maximum panel height
- Required distance between rollers
- Minimum glass edge distances
- Fixed-panel size requirements
Use the glass supplier’s calculated panel weight rather than estimating it visually. Never assume that adding extra rollers will increase capacity unless the manufacturer specifically approves that configuration.
Measure the Shower Opening Carefully
A sliding shower door track kit must fit the finished opening, not the unfinished framing.
Measure after tile, wall panels, curb materials and other finishes are installed. Take width measurements at the top, middle and bottom of the opening. Measure the height at more than one point as well.
Record the following:
- Finished opening width
- Finished opening height
- Curb width
- Wall thickness
- Available space above the glass
- Distance from plumbing fixtures
- Out-of-plumb wall conditions
- Out-of-level curb conditions
Do not assume the two walls are perfectly parallel. A significant difference between measurements can affect track length, panel overlap and water containment.
Can the Track Be Cut?
Many sliding shower door rails can be trimmed, but only within limits. Cutting a rail may change the location of mounting holes, door stops or soft-close mechanisms.
Before shortening a track, confirm:
- Whether field cutting is permitted
- Which end can be cut
- The minimum usable track length
- Whether holes must be redrilled
- How the cut edge should be finished
- Whether cutting affects the warranty
Confirm the Mounting Surface and Structural Support
Sliding glass systems transfer substantial weight to the walls and mounting points. Tile alone is not structural support.
The installation may require:
- Wood blocking behind the finished wall
- Stud attachment
- Approved masonry anchors
- Reinforced fixed-panel connections
- A sufficiently wide and level curb
- Correct fasteners for the wall material
If the walls are already finished, determine whether blocking or studs are located where the track brackets must be installed. Do not move brackets away from their specified positions simply to find a stud without manufacturer approval.
Improper anchoring can allow the rail to shift, causing poor door alignment or unsafe loading.
Compare Track and Roller Designs
The quality of the track and rollers directly affects how the door feels during operation.
Track Construction
Look for a rigid, corrosion-resistant rail with a profile designed for the supplied rollers. The track should resist flexing under the rated door weight.
Do not mix a rail from one system with rollers from another unless the components are explicitly approved for use together.
Roller Quality
Rollers should move smoothly without wobbling or excessive side-to-side play. Sealed or protected bearings can help reduce exposure to moisture and residue.
Useful roller features may include:
- Height adjustment
- Anti-lift or anti-jump protection
- Replaceable wheels
- Concealed fasteners
- Serviceable bearings
- Protective glass gaskets
Decorative roller size alone does not indicate quality or load capacity. Compare the manufacturer’s ratings and adjustment method.
Look for Anti-Jump Devices and Door Stops
A top-hung sliding panel must remain securely engaged with the rail. Anti-jump components prevent the door from lifting off the track during normal movement.
The system should also include properly positioned stops or bumpers. These control the travel of the door and prevent the glass or handle from striking a wall, fixed panel or fixture.
Confirm that:
- Anti-jump devices are included
- Stops are adjustable when necessary
- Bumpers contact the correct part of the door
- The handle will clear nearby glass and walls
- The sliding panel cannot leave the track
These components should be installed exactly as specified rather than treated as optional accessories.
Evaluate the Bottom Guide
The bottom guide keeps the sliding glass aligned without carrying the full door weight. Depending on the system, it may mount to the curb, fixed panel or floor.
Check the guide for:
- Compatibility with the glass thickness
- Sufficient panel overlap
- Appropriate adjustment
- Smooth internal surfaces
- Replaceable inserts
- A mounting method suitable for the curb
Some homeowners search for a sliding shower door without a bottom track. Many frameless systems do eliminate a full-length lower track, but they still require a small bottom guide to control the moving panel.
Decide Whether You Need Soft Close
A shower door soft-close mechanism slows the panel near the end of its travel. It can provide quieter operation and reduce harsh impact against the stops.
Before choosing this feature, verify:
- Minimum door weight requirements
- Maximum supported panel weight
- Required track length
- Whether soft close works in one or both directions
- Whether the mechanism is included or optional
- Access requirements for future replacement
Soft-close parts are system-specific. They should not be added to an incompatible rail or door simply because the components appear to fit.
Plan for Water Management
Frameless sliding shower doors are designed to control water, but they are not completely watertight. Proper panel overlap, curb slope and seal placement are essential.
Review whether the kit includes or supports:
- Bottom sweeps
- Vertical seals
- Fixed-panel seals
- Thresholds or water dams
- Bumpers
- Drip rails
The sliding panel should usually be positioned so that water flows back into the shower rather than into the overlap between panels. The correct orientation can depend on the showerhead location and door configuration.
Do not use oversized seals as a substitute for incorrect panel overlap or poor door alignment.
Check Handle and Knob Compatibility
Handles may be included with the kit, but many systems require them to be purchased separately.
Confirm:
- Glass hole diameter
- Center-to-center hole spacing
- Handle projection
- Interior clearance
- Exterior clearance
- Finish availability
- Whether the handle interferes with panel overlap
A large towel bar or pull handle may look attractive but prevent the panels from passing each other. This is particularly important with bypass doors.
Choose a Durable Finish
Popular shower hardware finishes include chrome, brushed nickel, matte black, polished stainless steel, brass tones and bronze tones.
Finish should be considered after technical compatibility. Check both the decorative finish and the underlying material because they are not the same thing.
Consider:
- Corrosion resistance
- Cleaning requirements
- Fingerprint visibility
- Compatibility with bathroom fixtures
- Availability of matching replacement parts
- Manufacturer care instructions
Avoid abrasive cleaners and harsh chemicals unless they are specifically approved for the finish. Coated finishes can be damaged by aggressive cleaning products.
You can compare available shower hardware only after confirming the specifications required by the glass and opening.
Review Everything Included in the Kit
Before ordering, create a component checklist.
A complete installation may require:
- Top rail
- Wall brackets
- Rollers
- Fixed-panel clamps or channels
- Bottom guide
- Door stops
- Anti-jump devices
- Handle
- Glass gaskets
- Bottom sweep
- Vertical seals
- Threshold
- Setting blocks
- Fasteners
- Installation template
Also identify the parts that are specifically excluded. A lower-priced kit may become more expensive if several proprietary components must be ordered separately.
Choosing Hardware for a Replacement Door
Replacing existing sliding shower door hardware requires closer matching than choosing components for a new enclosure.
Document the existing system before removing anything:
- Manufacturer and model
- Track profile and dimensions
- Roller diameter
- Roller offset
- Glass thickness
- Hole diameters
- Hole spacing
- Panel width and height
- Stop locations
- Bottom guide dimensions
- Handle hole spacing
A replacement roller that fits the rail may still be incompatible with the glass hole, bolt size or panel position.
When possible, use manufacturer-approved replacement parts for the existing system. If the glass is chipped, cracked or incorrectly fabricated for the new hardware, professional glass replacement may be safer than attempting to adapt it.
Common Buying Mistakes to Avoid
Choosing by Appearance Alone
A finish or roller design should never take priority over glass compatibility, capacity and structural requirements.
Assuming Shower Door Kits Are Universal
Track profiles, brackets, hole patterns and guides vary considerably between systems.
Ordering Glass Before Selecting Hardware
This can result in incorrect holes, notches, dimensions or panel overlap.
Ignoring the Finished Opening
Measurements taken before tile installation may no longer be accurate.
Mixing Components from Different Systems
Parts that appear similar may have different tolerances, capacities or mounting geometry.
Overlooking Fixed-Panel Support
The stationary panel may require a channel, clamps, header support or stabilizer bar.
Forgetting Water-Control Components
Missing sweeps, seals or thresholds can cause leakage even when the sliding mechanism works correctly.
Using Inappropriate Wall Anchors
The mounting system must suit the wall construction and the hardware manufacturer’s requirements.
Sliding Shower Door Hardware Kit Buying Checklist
Before purchasing a kit, confirm each of the following:
- The system matches the intended door configuration.
- The opening direction works with the bathroom layout.
- The kit supports the specified glass thickness.
- The panel weight is within the rated capacity.
- The panel dimensions meet the system’s limits.
- The rail fits the finished opening.
- Wall support is available at the mounting points.
- Required glass holes and notches are documented.
- Rollers, stops and anti-jump parts are included.
- The bottom guide matches the glass and curb.
- Handle clearance has been checked.
- Water seals and sweeps are available.
- The finish suits the bathroom and cleaning routine.
- Replacement components can be obtained.
- Installation instructions are available before glass fabrication.
Frequently Asked Questions
Are sliding shower door hardware kits universal?
No. Kits vary by door configuration, glass thickness, panel weight, rail profile, mounting method and glass fabrication requirements. Purchase components specifically designed to work together.
How do I know what size sliding shower door kit I need?
Measure the finished opening at the top, middle and bottom. Then compare the measurements with the kit’s allowable opening range, track length, panel overlap and glass width requirements.
Can I use an existing glass panel with a new hardware kit?
Possibly, but the glass thickness, dimensions, hole locations, notches and edge clearances must match the new system. Tempered glass cannot be safely modified after manufacture.
What is a bypass sliding shower door?
A bypass system has two panels that slide past each other on separate paths. It can allow access from either side, but it requires correct overlap and compatible handles.
Do sliding shower doors need a bottom track?
Not always. Many frameless systems use a top rail and a small bottom guide instead of a full-length lower track. The guide remains necessary to keep the panel aligned.
Which side should a sliding shower door open from?
The opening should provide safe entry, avoid fixtures and direct water away from panel gaps. Showerhead position, room layout and panel configuration should all be considered.
Is soft close necessary?
Soft close is optional, but it can provide quieter and more controlled movement. The mechanism must be compatible with the rail, panel weight and available travel distance.
Can different brands of sliding shower door parts be combined?
This is generally not recommended unless the manufacturers confirm compatibility. Small differences in dimensions or load ratings can affect performance and safety.
Final Thoughts
The best sliding shower door hardware kit is the one that matches the complete installation, not simply the bathroom’s finish.
Start with the door configuration and finished opening. Then confirm glass thickness, panel weight, fabrication requirements, structural support and track dimensions. Finally, review the rollers, guides, stops, seals, handles and replacement-part availability.
Treating the hardware, glass and enclosure as one coordinated system will help produce a sliding shower door that operates smoothly, controls water effectively and remains properly supported.


