

How to Measure for a Sliding Shower Door Kit, Step by Step
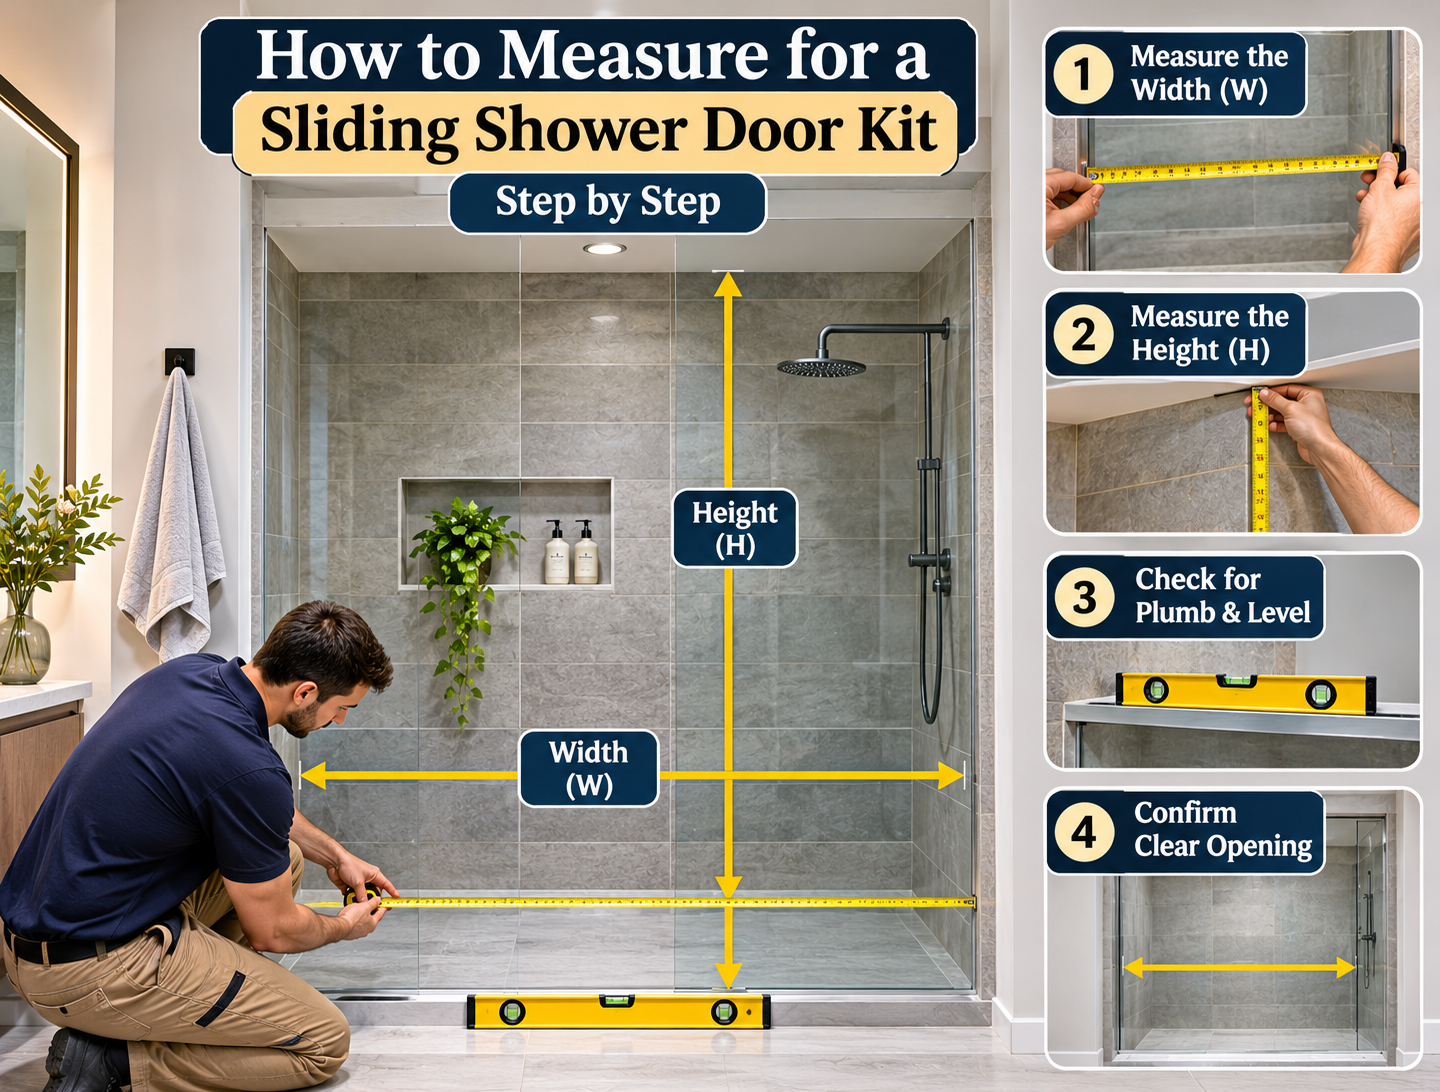


Accurate measurements are essential when installing a sliding shower door. Even a small error in the opening width, wall alignment, or glass dimensions can create installation difficulties, cause unwanted gaps, or prevent the door from sliding correctly. Whether you are replacing an existing enclosure or planning a new bathroom, knowing how to measure for a sliding shower door helps ensure the selected hardware fits the space.
Unlike traditional swinging doors, sliding shower systems require carefully coordinated tracks, rollers, glass panels, guides, and mounting hardware. The finished opening must accommodate the complete system while allowing enough clearance for the glass to move safely.
This guide explains how to measure a shower opening step by step, identify common measurement problems, and prepare the information needed to select a compatible sliding shower door kit.
Why Accurate Sliding Shower Door Measurements Matter
Sliding shower doors depend on precise alignment between the glass panels and their supporting hardware. The header or track must be positioned correctly, the rollers must operate along the intended path, and the glass must maintain the required clearances throughout its movement.
If the opening is measured incorrectly, the sliding panel may rub against the stationary glass, fail to reach the intended stop, or leave an excessive gap at the wall. Measurements taken before the walls are finished can also become inaccurate after tile, stone, or other materials are installed.
For these reasons, final measurements should normally be taken from the completed shower surfaces. The measurements must then be compared with the requirements of the exact sliding hardware system rather than converted into glass dimensions using a universal formula.
Tools Needed to Measure a Sliding Shower Door
Before beginning, prepare a reliable tape measure, a long level, a pencil, and a notebook or measurement worksheet. A laser level or digital angle finder can also be helpful when evaluating larger or more complicated openings.
Use a tape measure that provides clear, consistent readings, preferably in increments of 1/16 inch or finer. Record every measurement immediately rather than relying on memory, and identify exactly where each measurement was taken.
It is also helpful to keep the installation manual for the proposed sliding shower door kit available. The manual identifies the required measurement locations, allowable adjustment ranges, track-cutting formulas, and glass fabrication requirements.
Step 1: Measure the Finished Shower Opening Width
Start by measuring the horizontal distance between the finished walls where the shower door system will be installed. For most straight wall-to-wall enclosures, measurements should be taken at the bottom, middle, and top of the intended door opening.
At the bottom, measure directly above the finished shower curb or bathtub ledge. At the middle, measure between the walls approximately halfway up the planned enclosure height. At the top, measure the distance between the finished wall surfaces at the intended header or upper mounting position.
Record all three measurements separately. Do not assume the opening is perfectly rectangular, even in a recently renovated bathroom. Walls may lean inward or outward, and tile installation can introduce minor dimensional differences.
For example, an opening might measure 60 inches at the bottom, 59 7/8 inches in the middle, and 59 3/4 inches at the top. These measurements indicate that the available width changes by 1/4 inch across the height.
The narrowest measurement is important when checking whether a product can physically fit, but the final ordering dimension must follow the specific manufacturer’s instructions. Some systems allow adjustment for uneven walls, while others require corrections or custom fabrication.
Step 2: Measure the Shower Opening Height
Next, determine the intended height of the sliding shower enclosure. Measure vertically from the top of the finished curb, bathtub ledge, or approved mounting surface to the proposed upper edge of the system.
Take height measurements near the left wall, in the center, and near the right wall. This helps identify whether the curb and upper reference line remain consistent across the opening.
For a custom shower, the selected height should also account for the showerhead position, ceiling clearance, ventilation, and manufacturer requirements. A taller enclosure may offer greater splash protection, but it also increases glass weight and may affect the hardware selection.
Do not assume that the finished glass height will equal the desired overall enclosure height. Sliding systems often require specific allowances for rollers, headers, bottom guides, and other hardware. The manufacturer’s glass-sizing instructions should determine the finished panel dimensions.
Step 3: Check Whether the Walls Are Plumb
A wall is considered plumb when it is vertically straight. If one or both shower walls lean inward or outward, the opening width can change from bottom to top.
Place a long level vertically against each finished wall along the intended installation area. Check the left and right sides separately and record the direction and amount of deviation.
Out-of-plumb conditions can affect the header connection, door alignment, seal contact, and fixed-panel installation. Some shower hardware systems provide adjustment features to accommodate minor wall variations, but the available tolerance differs by manufacturer and model.
An uneven wall should not automatically be corrected by forcing the track or glass into position. If the deviation exceeds the kit’s permitted adjustment range, the enclosure may require suitable filler components, revised glass dimensions, or corrections to the mounting surface.
Step 4: Check the Shower Curb for Level and Slope
The shower curb or bathtub ledge provides an important reference point for the bottom guide, track, seals, and glass clearance. Before ordering a sliding shower door kit, verify that the intended mounting area is suitable.
Place a level along the curb to check whether the surface is consistent across the opening. Also evaluate the curb’s inward drainage slope, since a properly designed shower threshold should encourage water to return toward the shower interior rather than the bathroom floor.
A curb can have an intentional inward slope while still needing an appropriate mounting plane for the hardware. These two considerations should not be confused.
Pay particular attention to curbs with rounded edges, narrow surfaces, decorative stone overhangs, or uneven tile. Such conditions can affect the available space for a bottom guide or track.
Confirm that the mounting surface provides enough depth for the selected hardware and that installation will not compromise the shower’s waterproofing system.
Step 5: Identify the Sliding Door Configuration
Once the basic opening dimensions have been recorded, determine which sliding configuration is most appropriate for the bathroom.
A single sliding shower door generally consists of one moving glass panel and one stationary panel. A bypass configuration uses two movable panels that slide past each other. These systems require different glass dimensions, overlap allowances, and supporting hardware.
For example, the Denali Series 180 Degree Sliding Shower Door Kit from Daltex Glass is a frameless single-slider system designed for 3/8-inch tempered safety glass. It supports an overall opening width up to 78 inches and a maximum sliding-door weight of 90 pounds.
The Denali system uses a rectangular header and round glass rollers. Its standard header can be cut to fit approved smaller openings, but the exact cutting dimensions must follow the installation instructions.
Selecting the configuration before ordering glass is important because the required panel overlap, mounting locations, and fabrication details are specific to the chosen system.
Step 6: Determine the Available Sliding Clearance
The total shower opening width is not the same as the usable entrance width. A sliding door must overlap the adjacent panel and remain engaged with its guides and stops.
For a single sliding system, determine where the stationary panel will sit and how far the moving panel can travel without interfering with a wall, handle, or other hardware component.
The available entrance is determined by the door dimensions, overlap, stopping positions, and hardware geometry. A wider overall opening may still provide a restricted entrance if the chosen system requires substantial panel overlap.
Measure nearby fixtures and obstacles that could interfere with use. Consider the vanity, toilet, towel bars, shower controls, and any projecting accessories.
It is also important to confirm whether the sliding panel should open from left to right or right to left. Some kits are reversible, while others have specific installation requirements.
Step 7: Verify Glass Thickness and Weight Requirements
Sliding shower door hardware is engineered for specific glass thicknesses and weight capacities. These requirements determine whether the rollers, guides, and support components can safely carry the intended panel.
Common frameless sliding systems use 3/8-inch or 1/2-inch tempered safety glass, but the correct thickness depends on the selected product.
The Denali system, for example, requires 3/8-inch tempered safety glass and has a maximum sliding-door weight of 90 pounds. The overall width limit does not automatically mean that every possible glass height and width combination is acceptable.
Panel weight must be calculated using the final glass dimensions and specified thickness. Hardware limitations must be checked before fabrication, especially for tall or oversized enclosures.
If a project requires thicker glass, review alternative sliding shower door systems designed for the relevant loading and installation conditions.
Step 8: Confirm Glass Fabrication Requirements
The selected hardware determines the glass hole locations, cutouts, edge preparation, and panel dimensions. These fabrication requirements must be finalized before the glass is tempered.
For the Denali sliding system, each top glass roller requires a 5/8-inch diameter mounting hole. The precise hole locations must follow the approved installation template.
Tempered safety glass cannot be drilled, cut, or notched after tempering. Therefore, ordering glass before confirming the hardware specifications can result in panels that cannot be used with the intended system.
The fixed glass panel may also require additional brackets, U-channels, or clamps that are not included in the primary sliding kit. These components must be considered when planning glass dimensions and installation clearances.
An experienced glass fabricator can coordinate the final panel dimensions with the manufacturer’s instructions and the verified finished opening.
Step 9: Double-Check All Measurements Before Ordering
After completing the initial measurements, review the entire opening and confirm that the information is consistent.
Compare the top, middle, and bottom widths. Recheck the left, center, and right heights, and confirm the wall deviations and curb conditions. Record the preferred entrance side, intended glass thickness, and any nearby obstacles.
For custom installations, photographs of the opening can help a supplier or installer understand conditions that may not be obvious from the numbers alone.
The final ordering dimensions should be approved against the exact kit specifications. If the shower opening contains unusual angles, substantial wall variation, or questionable structural support, professional field measurement is particularly important.
Common Mistakes When Measuring a Sliding Shower Door
One common mistake is measuring the unfinished shower before the final tile or stone surfaces have been installed. Even modest changes in wall thickness can reduce the available opening and make a previously selected kit unsuitable.
Another mistake is taking only one width measurement. A shower opening may be wider at the bottom than the top, or the walls may lean in opposite directions. Recording multiple measurements identifies these differences before the hardware is ordered.
Homeowners also sometimes confuse overall opening width with the width of the glass door itself. Sliding systems require overlap and running clearances, so glass panel dimensions should never be calculated simply by dividing the opening in half.
Finally, ignoring the manufacturer’s installation template can lead to incorrect roller holes, incompatible glass preparation, or a poorly aligned track. Accurate field measurements are only useful when they are applied through the correct hardware specifications.
When Should You Hire a Professional to Measure?
Professional measurement is advisable for custom frameless enclosures, oversized glass panels, uneven walls, complicated curb designs, and projects requiring specialized hardware.
A professional installer can evaluate structural support, confirm the available adjustment range, and determine whether the selected configuration provides sufficient entrance clearance and appropriate water containment.
Professional coordination is also valuable when the enclosure requires glass fabrication because manufacturing errors cannot usually be corrected after tempering.
For additional guidance, Daltex Glass explains the importance of glass compatibility, mounting requirements, and component selection in its sliding door hardware guide.
Final Thoughts
Learning how to measure for a sliding shower door requires more than recording the width and height of an opening. Wall alignment, curb conditions, entrance clearance, glass thickness, hardware capacity, and fabrication requirements all affect whether the finished enclosure will fit and operate correctly.
The most reliable approach is to measure the completed shower at several locations, document any irregularities, and compare the findings with the installation instructions for the exact hardware system.
Accurate preparation helps reduce installation problems, protects the investment in custom glass, and supports smooth, reliable shower door operation over time.
Frequently Asked Questions
How do you measure for a sliding shower door?
Measure the finished opening width at the top, middle, and bottom. Then measure the desired enclosure height at the left, center, and right. Check the walls for plumb, evaluate the curb, and compare the dimensions with the chosen kit’s installation instructions.
Should you measure a shower door before or after tiling?
Final shower door measurements should generally be taken after the tile, stone, or other finished wall surfaces are installed. Measuring too early can produce inaccurate dimensions because the finish materials change the available opening.
What if the shower walls are not straight?
Some sliding shower door kits allow limited adjustment for out-of-plumb walls. The acceptable variation depends on the specific system. Larger deviations may require corrections to the mounting surface or revised enclosure planning.
Can I cut a sliding shower door track to fit?
Some sliding shower door tracks can be cut to an approved length. However, the cutting formula, allowable dimensions, and permitted cutting location depend on the manufacturer. Never assume that every track can be shortened.
How much overlap should sliding shower doors have?
The required overlap depends on the door configuration, glass width, guide position, and manufacturer’s design. There is no universal overlap measurement suitable for every sliding shower door system. Use the fabrication and installation instructions for the selected kit.
Can I measure and install a sliding shower door myself?
You can take preliminary measurements yourself, but installation may require professional assistance, particularly for heavy frameless glass. Structural attachment, glass alignment, drilling, and safe handling of tempered panels require appropriate tools and experience.


